
Try This: Cyanotype Prints
Posted by  Jen Messier on jun 10, 2019 under Blog Post
Making cyanotypes (or "blueprints") is one of the most pleasurable fair-weather activities around. You get to make beautiful, indigo-colored photograms while hanging out in the sunshine, making it the perfect summer activity.
Cyanotypes are a form of cameraless photography invented in 1842 but John Herschel. A sheet of paper (or fabric, or wood) is coated with light-sensitive chemicals. Objects are placed onto the surface and it's then exposed in the sun. After exposure, the print is rinsed and you're left with a lovely image of the object you exposed.
In general, the object that was placed on the surface appears white on the final print, and the area that was exposed to the sun turns a dark blue.
 during exposure

final rinsed print
If all of this seems a little complicated, don't worry. Cyanotypes are a super flexible process that allow you to dive as deep as you'd like, or you can purchase the materials straight from the art store and be making prints within minutes. Below, I'll talk about the three main types of cyanotype paper and fabric that are easily available and accessible to beginners, but first, let's go over the general materials and process that you'll need to make a print.
Materials needed:
- Light-sensitive paper or fabric, like Nature Print Paper or Jacquard Cyanotype Fabric, discussed in detail below
- Objects to place on surface: weeds, flowers, paper clips, lace, really anything that's flat!
- Piece of cardboard to carry your print outside on - this is important and easy to forget!
- Piece of plexi/glass to cover print while it's being exposed - otherwise it will blow away
- Access to water - this can be a sink, a tray, a hose, really anything!
General Cyanotype Making Process:
1 - Place your pre-coated paper or fabric on a rigid surface indoors.
2 - Arrange the objects you'll be using to make a print (lace, flowers, paper clips) in the desired composition
3 - Cover your composition with plexi or glass and place outside in direct sun, like below:
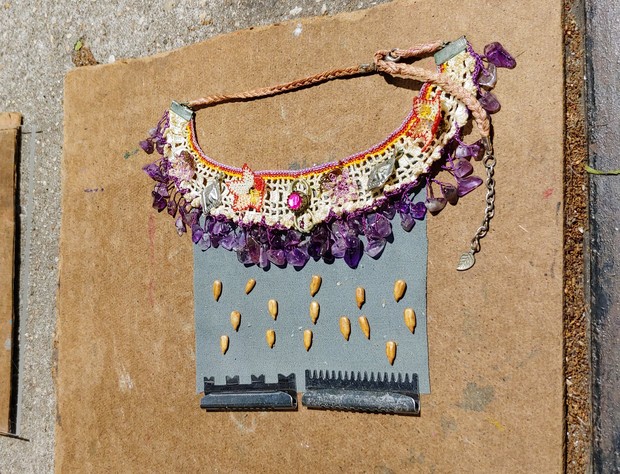
4 - Expose for a certain legnth of time, usually between 2-15 minutes, depending on a number of factors. These factors can include: cloud cover, angle of sun, type of paper being used). In general, you're looking for your fabric or paper to change color during exposure.
5 - Bring your cyanotype inside and rinse excess chemicals off in the sink, generally for about 1 minute. After rinsing, soak your print in a cool water bath for about 5 minutes.
6 - Let your print dry! It will darken over the next 24 hours to a dark blue as it oxidizes. The final print below is the same print as pictured in step 3 above:

What type of paper should I use?
Now this is where it gets fun! The first two options discussed below, Nature Print Paper and Jacquard Cyanotype Fabric, are available ready to use from the art store. Once you get them, you can be outside and printing in minutes. These are great options for beginners.
The third option, coating your own paper with the cyanotype chemicals, requires more prep and time, but offers the most flexibility for those wishing to expore cyanotypes in more depth.
Nature Print / Sun Print Papers
These papers are by far the easiest and quickest ways to get up and printing with the sun. You buy a pack from the store, grab some flowers, and you can have a finished, rinsed print in about 5 minutes flat. I'd recommend these for absolute beginners trying out the process for the first time.
They're also great for kids, as they're affordable and easy to rinse. I enjoy using them greatly as well, with the only downside being that the paper itself is thin, almost like copy paper, and as such they don't make "fine art" quality prints.
Jacquard Cyanotype Fabric
For a premium product that can also be purchased ready to use at the art store, I love Jacquard Cyanotype Fabric. The fabric is cotton sateen and also pre-coated with cyanotype chemicals, meaning it's ready to go straight out of the package. The fabric is thick, can be sewn through afterwards, and feels very high quality. It is a bit expensive though, and it takes longer to rinse your final prints as the cotton has soaked up quite a bit of chemicals.
Hand-Coated Paper = watercolor paper + cyanotype chemicals

hand-coated cyanotype paper, before exposure to the sun
My absolute favorite paper for making cyanotypes is paper I've coated myself from an easily-available chemical set purchased at the art store or online. The chemicals themselves are inexpensive and last for many, many prints, with each $15 or so set of chemicals coating about 65 8x10 sheets of paper.
Depending on the expense of the paper you use, this is also a very affordable way to make cyanotypes. I personally like coating bristol board or inexpensive watercolor papers from Canson or Strathmore.
When you purchase your chemical set, you'll get two bottles filled with powders, part A (potassium ferricyanide) and part B (ferric ammonium citrate):

my well-loved cyanotype chemical set
Add water to fill each bottle (be careful and sure not to inhale and of the powder!), re-cap, and shake thoroughly. Let the bottles sit overnight before coating any paper. In this state, the chemicals will last for months, as long as you don't mix part A and B together.
When you're ready to coat paper, find yourself a dark room and spread out your sheets. Mix equal parts A and B together in a bowl, stir up with your paintbrush, and get to work coating the paper. What I love about this process is that you can make your brush strokes as visible or invisible as you'd like, resulting in a final cyanotype print that looks very handmade.
The coated paper should be left to dry in a dark area away from sun, then stored in a lightproof bag or tin foil. Just don't let the sun get your paper before you're ready to make a print! It's advised that you use up coated paper within a week or so, but I generally have fine results with even older paper.
As you can see, this method is a bit more work than the others, but the results are worth it, especially if you'll be making lots of prints!
Please feel free to ask any questions in the comments section below!
this post contains affiliate links!
Tagged with altenative photography cyanotype nature paper
Comments